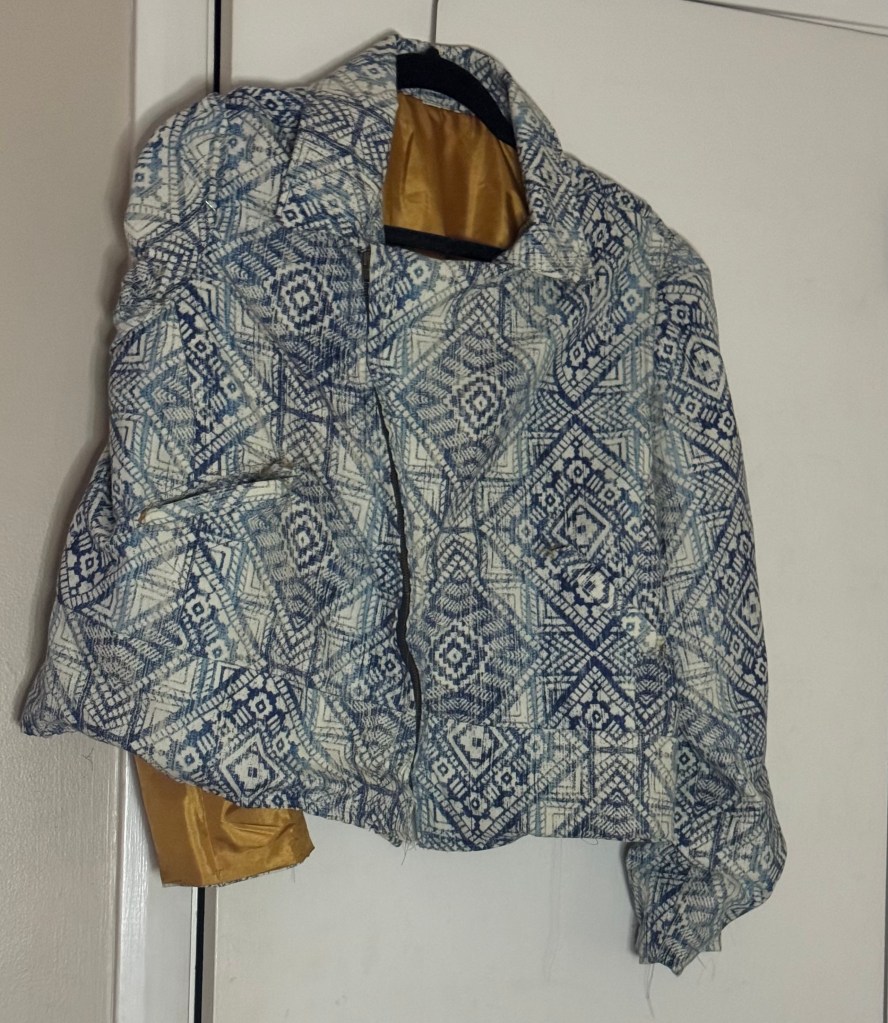
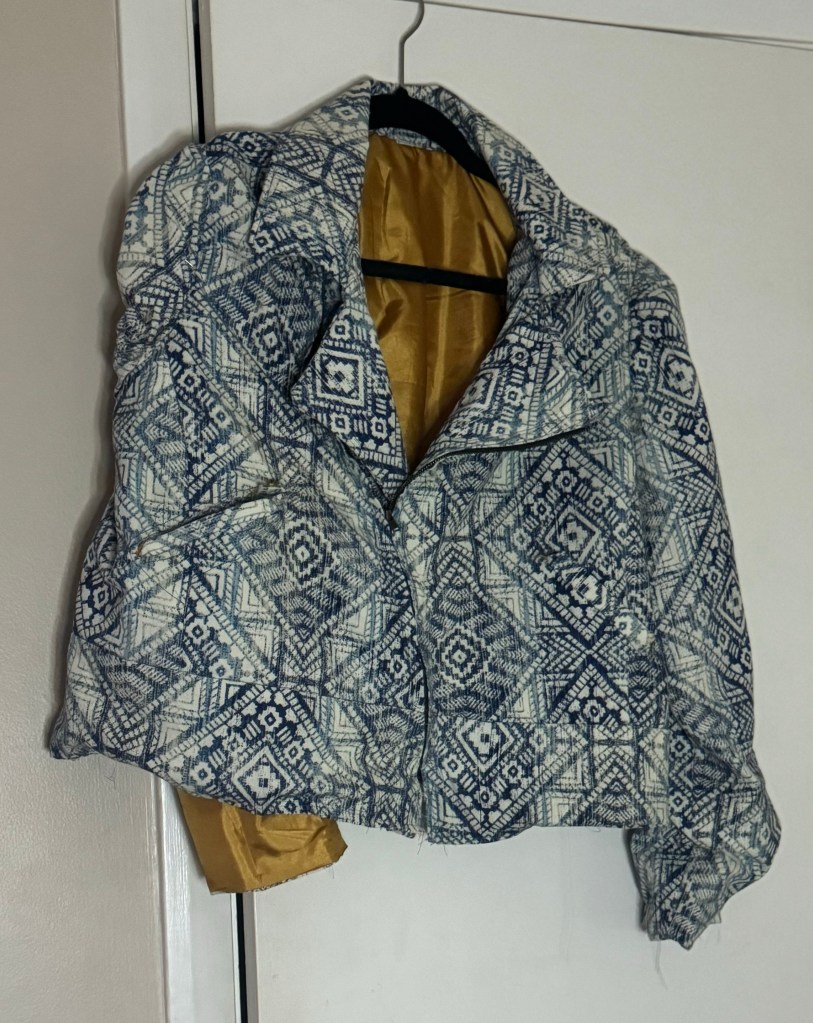
I hate when a pattern calls for hand sewing. So much so that I will legit stop working on the project and send it to WIP’s hell. You know the place where you put your WIPs with no intent of ever finishing them. LOL. Well, last week I decided to resurrect all my WIPS from WIP’s hell. First up was this jacket I made using McCalls 8121. This jacket occupied my mind for months before I even purchased the pattern because it is FIYAH. The pattern isn’t available on Simplicity.com but you can get a copy from JoAnns. Here’s the link McCalls 8121.
The pattern presented a few challenges for me. One, I have never sewed an exposed zipper. The technique I learned to install zippers when I first started sewing results in the zipper being covered by the fabric. So I had to learn that technique. Two, it has welt pockets. If you are unfamiliar with welt pockets, here is a description and instructions for executing them from Mood. The cliff notes version is that they are hidden pockets with a small slit opening. Thus, you have to cut the fabric and pull the pocket through the hole in the fabric. Needless to say, my intermediate beginner sewist’s ass was shook. I mean what if I messed up my fabric by cutting a weird hole in it. It was super hard to secure this fabric from Joann’s. I had to go to a store about an hour away to get it. After awhile I was just like “YOLO” and got to it. For my first time I have to admit it was pretty pretty good.
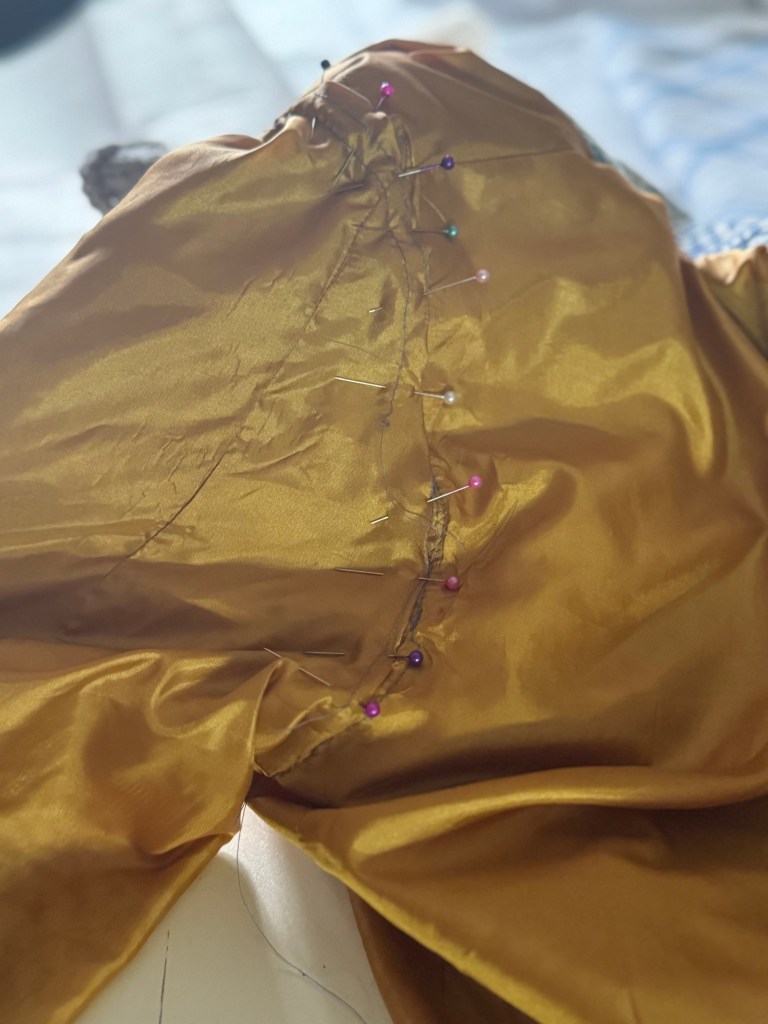
Then as if the exposed zipper and welt pockets were not enough, the jacket was fully lined, another thing I had no experience sewing. Now, could I have skipped this step? Probably. However, I could hear my mother’s voice in my head complaining about the quality of the work clothes I bought from Mandee’s for my first job because the pants, jacket and skirt – that all came together for one price – were not lined. Thus, I knew it was important that this jacket be lined. And honestly, installing the lining wasn’t that bad until it came to the sleeves. The instructions to install the lining for the sleeves required hand sewing, specifically slip stitching. For the first sleeve, my intermediated beginner sewist ass decided that the instructions were just making this part unnecessary difficult so I would bypass that part and just machine sew it…. Yeah about that. With the machine sewing, I noticed that the first sleeve does not lay right and has a runched look. which did not look like the picture on the pattern. This is when I decided to place the jacket in WIP’s hell. And so here we are.
I started the hand sewing on the other sleeve as I want to see whether it makes a difference but yeah if I could find a great alternative that would be preferred.
Do you have any tips or tricks to get around hand sewing on a project? If not, what is the least painful way to get it done.
Welcome to JMO About Sewing, a sewing blog from an intermediate beginner perspective. My preferred name is Sasha and I am an intermediate beginner sewist. What is an intermediate beginner sewist you ask? An intermediate beginner is a term that I made up – I think- because after a few years of sewing I just did not want to be called a beginner anymore. LOL. I mean I can install a zipper and buttons – with and without the button hole foot (however it’s always better with), I can line a jacket and I can also make minor fit adjustments to patterns; however, I have never installed a hook and eye or made something that look like it came straight off the rack. So I’m not a beginner beginner anymore. Right?
So how did I get into sewing. Well I guess my first sewing project was in home economics class. Do they still have that in school? We made a heart pillow with a lace picture frame center. Awful I know. My next project probably more than a decade later, was a night gown I wanted to make for my sister as a Christmas present. Every night when I came home at 3 am from work I would work on it. However, I did not remember anything about sewing nor did I even know how to read or use a pattern; thus, I had to enlist my mother for help. SMH. My mother would review my work when she was around and leave instructions for me for the next step. The last thing she told me to do was to pin the pieces together. Simple right? Well it took approximately a week or so to pin the pieces together. I had to even make a run back to the craft store to get more pins because one pack was not enough. LOL. SMH. When I finished pinning the pieces together, my mother came to inspect it and busted out laughing. My mother thought it was soo funny that she told me to pack up the nightgown and wrap it in its pinned state to give to my sister – plus there wasn’t enough time to remove the pins, get instruction on how to properly pin it and then sew the gown before Christmas. On Christmas morning when my sister opened the box she was mad confused but my mother explained how I worked so hard on the protect every night after work and the amount of time it took me to pin the garment together. My sister was so appreciative of the time and effort that I put into it that she kept the nightgown as is. She probably had a lot of sticky nights. Ba-dum-DUM!
After my failed attempt at sewing I started exploring other crafts, latch hook – I think they call this tufting now-, crocheting, needle point/embroidery, plastic canvas and my fave knitting. I mean I used to knit like it was my part time job. What’s up to all my knitters! However, I still longed to learn how to sew. I just think it is soo dope to be able to make your own clothes in the colors and patterns you like and the fit that works for your body. So after the pandemic and a divorce I finally decided to do the big one like the kids say and sign up for a class. In the class I learned how to make a maxi skirt with pockets and an elastic waistband, install buttons and zippers and how to construct a fitted waist band with interfacing – such a good way to tuck the fupa. My first completed project in class was a pillow with a zipper and I have been an avid sewist since.
On this blog, you’ll be coming with me on my sewing journey to becoming an advanced/experienced sewist and pattern designer (your good sis has to get at least one in) and having a good time along the way. I’ll be sharing some of the tips and stuff that I learned or am learning on my journey, the clothes and items that I made/make and doing some pattern and fabric reviews. I’ll also be telling some crazy stories along the way. So tap in and let’s have some fun.
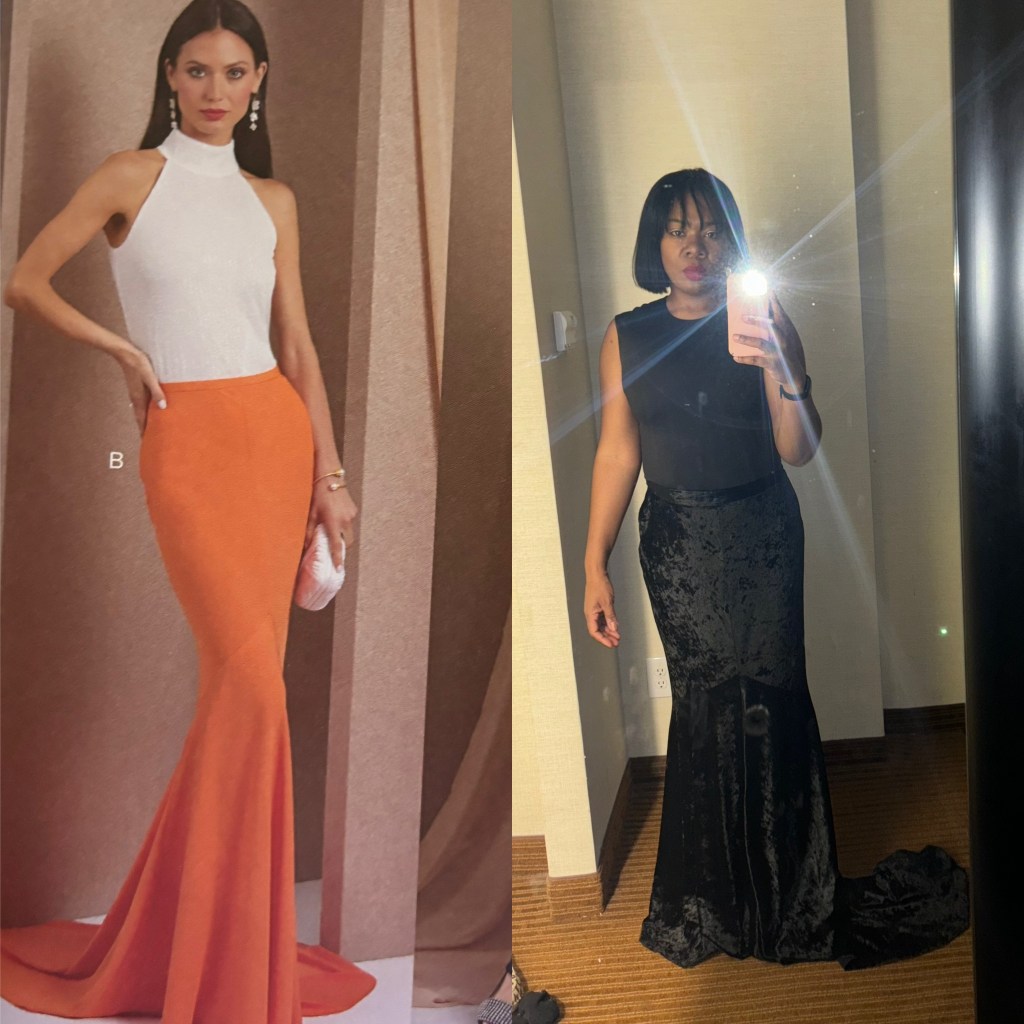
Hey! It’s your favorite intermediate beginner sewist here with my first pattern and fabric review. The pattern is an older Vogue pattern and I made view B.
I choose view b of the pattern because I felt like it would bring the drama – which it did. I wear a size 8-10 in women’s clothing and initially made the size 18 when I did my muslin – always do a muslin- and went down a size for the final make. On the smaller size of the pattern 16 the largest and 18 is the smallest on the larger option – so I had to purchase both. The pattern also lists the following notions: an invisible zipper, hook and eye closure and interfacing. The pattern was really straight forward and only had 5 pieces.
After making my muslin in the larger size, I ran out of tracing paper and my fave Pellon tru grid 810 to trace my patterns. I tried using shipping paper from Staples but it was a flop. Woomp! Woomp!. Thus, for the first time since I started sewing I had to use the tissue pattern paper that comes with the pattern… NEVER AGAIN!. I do not know whether it was the fabric I used on just the tissue paper but it was harder than normal to cut the fabric using the tissue paper. Another first for me was cutting my fabric on the floor. The train on view B is super long and has to be cut on the bias soo it did not work out on my cutting table.
The other thing I would note about the pattern is that the fabric is cut on the bias so the pattern calls for the skirt to be hung at least 24 hours before hemming the skirt.
FINAL VERDICT…
Difficulty: Easy
Would I make it Again: Absolutely
Pros: An easy to make skirt that you can wear to a formal or semi formal event, brunch with friends or to Target with a cool T-shirt – I’m extra. LOL.
Cons: None
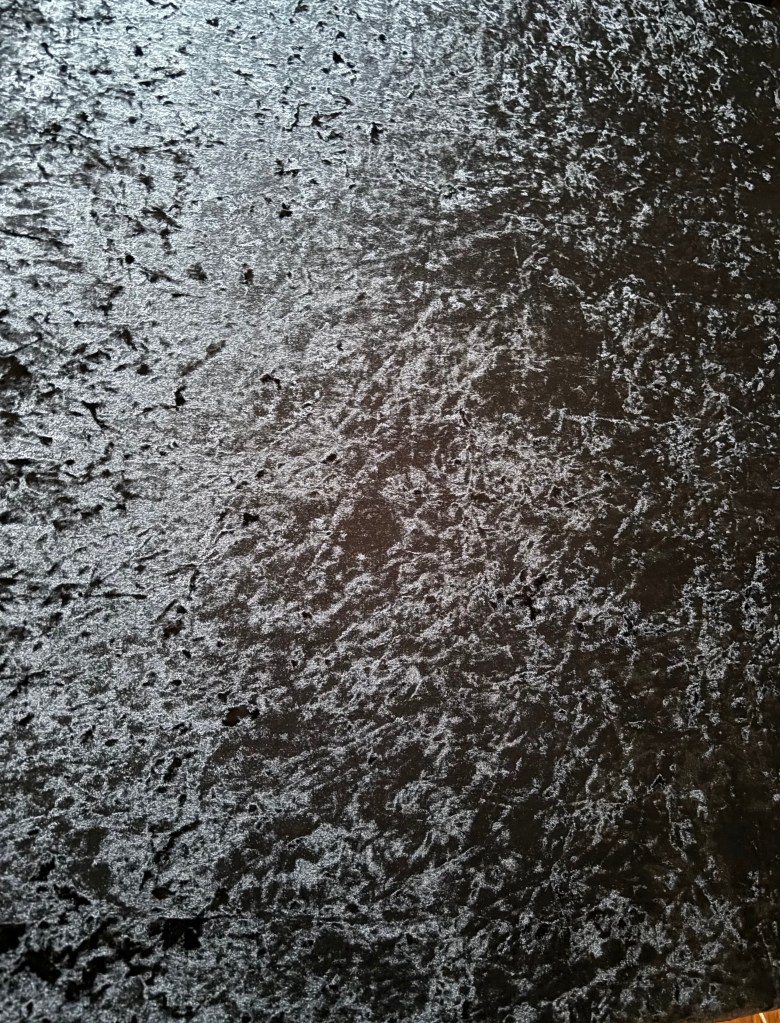
JMOAbout Ice Velvet Fabric……..
Now to the fabric. The pattern recommends crepe or jacquard and I initially purchased a beautiful jacquard but the party I wore it to turned out to require black and silver attire so I had to pivot and quickly. My daughter was wearing black velvet pants so I decided to match her fly and go with a velvety fabric also. I got the fabric from Joann’s. Here’s the link: Ice Velvet Fabric
This was my first time working with velvet fabric. I always prewash my fabric and this fabric washed up nicely. I normally use clips but switched to pins thinking the pins would hold the fabric more securely… WRONG! Thank God for my trusty old seam ripper. After ripping out the seams when the pieces on the bottom of the skirt were about a 1/4 inch off for the second time, I decided to use the basting spray I had on hand for embroidery. IT WORKED! I used the spray to temporarily baste the seams together and then stitched them together. The basting spray temporarily holds the fabric together and does not leave a sitcky residue so don’t worry if you get some outside of the seam allowance. For the stitches, I used a zigzag stitch on the sides and down the back because the fabric had some stretch in it, just in case I wanted to drop it low at the party.
Final Verdict…
The skirt turned out to be everything I imagined and more.
Would I Buy it Again: YES!
Pros: Elegant and soft and readily available at your local Joann’s.
Cons: None.
Welcome to JMO About Sewing, a sewing blog from an intermediate beginner perspective. My preferred name is Sasha and I am an intermediate beginner sewist. What is an intermediate beginner sewist you ask? An intermediate beginner is a term that I made up – I think- because after a few years of sewing I just did not want to be called a beginner anymore. LOL. I mean I can install a zipper and buttons – with and without the button hole foot (however it’s always better with), I can line a jacket and I can also make minor fit adjustments to patterns; however, I have never installed a hook and eye or made something that look like it came straight off the rack. So I’m not a beginner beginner anymore. Right?
So how did I get into sewing. Well I guess my first sewing project was in home economics class. Do they still have that in school? We made a heart pillow with a lace picture frame center. Awful I know. My next project probably more than a decade later, was a night gown I wanted to make for my sister as a Christmas present. Every night when I came home at 3 am from work I would work on it. However, I did not remember anything about sewing nor did I even know how to read or use a pattern; thus, I had to enlist my mother for help. SMH. My mother would review my work when she was around and leave instructions for me for the next step. The last thing she told me to do was to pin the pieces together. Simple right? Well it took approximately a week or so to pin the pieces together. I had to even make a run back to the craft store to get more pins because one pack was not enough. LOL. SMH. When I finished pinning the pieces together, my mother came to inspect it and busted out laughing. My mother thought it was soo funny that she told me to pack up the nightgown and wrap it in its pinned state to give to my sister – plus there wasn’t enough time to remove the pins, get instruction on how to properly pin it and then sew the gown before Christmas. On Christmas morning when my sister opened the box she was mad confused but my mother explained how I worked so hard on the protect every night after work and the amount of time it took me to pin the garment together. My sister was so appreciative of the time and effort that I put into it that she kept the nightgown as is. She probably had a lot of sticky nights. Ba-dum-DUM!
After my failed attempt at sewing I started exploring other crafts, latch hook – I think they call this tufting now-, crocheting, needle point/embroidery, plastic canvas and my fave knitting. I mean I used to knit like it was my part time job. What’s up to all my knitters! However, I still longed to learn how to sew. I just think it is soo dope to be able to make your own clothes in the colors and patterns you like and the fit that works for your body. So after the pandemic and a divorce I finally decided to do the big one like the kids say and sign up for a class. In the class I learned how to make a maxi skirt with pockets and an elastic waistband, install buttons and zippers and how to construct a fitted waist band with interfacing – such a good way to tuck the fupa. My first completed project in class was a pillow with a zipper and I have been an avid sewist since.
On this blog, you’ll be coming with me on my sewing journey to becoming an advanced/experienced sewist and pattern designer (your good sis has to get at least one in) and having a good time along the way. I’ll be sharing some of the tips and stuff that I learned or am learning on my journey, the clothes and items that I made/make and doing some pattern and fabric reviews. I’ll also be telling some crazy stories along the way. So tap in and let’s have some fun.


Leave a comment